Showing posts with label Pies and tarts. Show all posts

Saturday, June 2, 2012

Cherry Tomato And Caramelized Onion Bites


This recipe comes from one of my favorite food blogs Passionate About Baking.  and is a great way to use the beautiful cherry tomatoes over ripening in my kitchen counter!


Prep Time: 15 minutes
Total Time: 40 minutes

Ingredients:

■ puff pastry

■2 red onions, sliced very fine {approx 150gm}

■1 tbsp butter

■1 tbsp olive oil

■150-200gm cherry tomatoes, halved

■ Few leaves of fresh basil chiffonade

■1 clove garlic, minced

■1 tsp white vinegar

■1 tbsp extra virgin olive oil

■Sea salt

■Freshly ground pepper


Directions:

1.Roll out the pastry into a 10.5″ X 10.5″ square. With a pizza cutter/pastry wheel, trim the edges and cut into 2.5″ squares {8 small}

2.Score a tiny border about 1/4 cm along the inside edge, taking care not to cut right through. Place on parchment lined baking tray and chill for about 30 minutes, until the topping is ready.

3.Gently sauté the finely sliced onions in 1tsp butter and 1 tbsp olive oil until golden brown and caramelised. Reserve in a bowl.

4.Toss the halved cherry tomatoes with the basil, garlic, 1 tbsp olive oil, vinegar, salt & pepper. Taste and adjust flavours. Set aside for a little while for the flavours to mature, about 10-15 minutes.

5.Preheat oven to 200C.

6.Take pastry out of fridge. Divide the caramelised onions between the bases, ensuring they stay within the scored edges.

7.Give the tomatoes a good stir, and top the onions with about 5-6 halves each, cut side up. Sprinkle with a little sea salt.

8.Bake for 15-20 minutes until golden and puffy.

9.Serve warm or at room temperature.

Saturday, May 19, 2012

Basic Pizza Dough In Minutes!


If you have been a follower or subscriber of Lindaraxa, my main recipe blog, you know how much I have always hated to bake crust.  Well, not anymore.  I have become a master dough maker simply by plunging right in and making one right after the other until I finally got the hang of it.  The fear is gone! Not only that, after years of buying ready made pizza dough,  thanks to this recipe,  I am now a very decent pizza dough baker. 

Summer is coming and the possibilities are endless.  Watch this video and go for it!


Time: 2 to 3 hours, mostly unattended, or less in a pinch
Yield: 2 pies, 4 to 6 servings.


Ingredients: 


3 cups all-purpose or bread flour, or more as needed, plus more for kneading
1 teaspoon fast-rising yeast (2 teaspoons if you’re in a hurry)
2 teaspoons salt, plus more for sprinkling
2 tablespoons olive oil, plus more as necessary
Rosemary, optional.


Directions: 


1. Put the 3 cups flour, yeast, 2 teaspoons salt and 2 tablespoons of the olive oil in a food processor. Turn the machine on and add 1 cup water through the feed tube. Process until the mixture forms a slightly sticky ball, about 30 seconds. If the mixture is too dry, add more water 1 tablespoon at a time and process for 5 to 10 seconds after each addition. If the mixture refuses to come together, add more flour 1 tablespoon at a time and process until it does.

2. Rub a little olive oil or sprinkle a little flour onto your hands and shape the dough into a ball; wrap in plastic. Let rest at room temperature until the dough doubles in size, 1 to 2 hours. Or, if time is tight, let it rest at least 20 minutes before proceeding. Or refrigerate for several hours, deflating if necessary if it threatens to burst the plastic. (Or divide in half, wrap each ball in plastic, slip into a plastic bag and freeze.) Let it return to room temperature before proceeding.

3. Reshape the dough into a ball and cut in half, forming 2 balls. (From here on, use olive oil if you’re cooking on baking sheets, flour if on a pizza stone.) Put them on a lightly floured surface (a pizza peel is ideal), sprinkle with flour and cover with plastic wrap; or brush then with a bit of oil and place on a lightly oiled sheet. Let rest for about 20 minutes, while you heat the oven to 500 degrees.

4. Press a dough ball into a 1/2-inch-thick flat round, adding flour or oil to the work surface as necessary. Press or roll the dough until it’s as thin as you can make it; let it rest a bit if it becomes too elastic. (Patience is your friend here.) You can do two baking sheets at once, or one after another, as you’ll have to if using a peel. If doing the latter, slide the dough from the peel onto the stone.

5. Sprinkle the pizzas with olive oil (just a little), salt and rosemary. Bake for at least 10 minutes, perhaps rotating once, until the crust is crisp. Serve hot, warm or at room temperature.


A version of this recipe appeared in print on April 18, 2012, in the New York Times
Recipe Mark Bittman, How To Cook Everything, The Basics


Friday, September 30, 2011

Mushroom and Stilton Galette Simplified


There is a recipe from Williams Sonoma Seasonal Celebrations Series, Autumn cookbook that has made the rounds in the foodie blogosphere.  It is wonderful but rather time consuming in the making.  The problem comes with the dough which has to be frozen a couple of times before going into the oven.  I tried it tonight without all the fuzz and it was wonderful.

To begin with, I did not put the flour and butter in the freezer; but if you wish to proceed with this step may I suggest you do that the night before.  I added all the pastry ingredients to the bowl of the Cuisinart and pulsated 6 or 7 times until it all came together.  Then I stuck it in the freezer for an hour.

I skipped the dried mushrooms (step #2) and went straight to sauteing the fresh porcini, shiitakes and bella mushrooms I had.  For the cheese, I substituted Gruyere but I can't wait to make it with Stilton or Roquefort,

White vermouth was added to the mushrooms and reduced before adding the mushrooms to the tart.

This makes a great Fall lunch accompanied with a salad and a glass of dry French rose.

Serves 4

Ingredients


For the pastry:

1 1/4 cups all-purpose flour

1/4 tsp. salt

8 tablespoons (1 stick) unsalted butter, cut into

pieces

1/4 cup sour cream

2 tsp. fresh lemon juice

1/4 cup ice water

For the filling:

1/4 ounce dried wild mushrooms, such as chanterelles, porcini or shiitakes

1 cup boiling water

2 tablespoons unsalted butter

3/4 cup sliced green onions

1 garlic clove, minced

1/2 teaspoon chopped fresh rosemary

1/2 teaspoon chopped fresh thyme

1/2 lb. assorted fresh wild mushrooms, such as

chanterelles, porcini and shiitakes, brushed

clean and large mushrooms thinly sliced

1/2 lb. fresh button mushrooms, brushed clean

and thinly sliced

1/4 cup white Vermouth (optional)

5 ounces Stilton or other good-quality blue cheese (for a mild flavor use Gruyere)


Procedure

1. To make the pastry, in a bowl, combine the flour and salt. Place the butter in another bowl. Place both bowls in the freezer for 1 hour. Remove the bowls from the freezer and make a well in the center of the flour. Add the butter to the well and, using a pastry blender, cut it in until the mixture resembles coarse meal. Make another well in the center. In a small bowl, whisk together the sour cream, lemon juice and water and add half of this mixture to the well. With your fingertips, mix in the liquid until large lumps form. Remove the large lumps and repeat with the remaining liquid and flour-butter mixture. Pat the lumps into a ball; do not overwork the dough. (I put everything in the food processor and pulsed 6 -8 times until it came together) Cover with plastic wrap and refrigerate for 1 hour. (I stuck it in the freezer)

2. Meanwhile, make the filling: Place the dried mushrooms in a small bowl and add the boiling water. Let stand for 30 minutes until softened. Drain the mushrooms and mince finely. ( I skipped this step..I told you, it is simplified)

3. Preheat an oven to 400°F.

4. In a large fry pan over medium heat, melt the butter. Add the green onions and saute, stirring occasionally, until soft, about 5 minutes. Add the garlic, rosemary and thyme and continue to cook, stirring, for 1 minute more. Increase the heat to high, add the fresh and rehydrated mushrooms, and saute until the mushrooms are tender and the liquid they released has completely evaporated, 8 minutes.  Add vermouth and reduce. Transfer to a plate and let cool.

5. On a floured work surface, roll out the dough into a 12-inch round. Transfer to an ungreased baking sheet. Crumble the blue cheese into a bowl, add the cooled mushrooms and stir well. Spread the mixture over the dough, leaving a 1 1/2-inch border. Fold the border over the mushrooms and cheese, pleating the edge to make it fit. The center will be open.

6. Bake until golden brown, 30 to 40 minutes. Remove from the oven, let stand for 5 minutes, then slide the galette onto a serving plate. Cut into wedges and serve hot.

Friday, September 2, 2011

Blackberry Cobbler


This classic cobbler is topped with a simple, rich biscuit dough that lets the berries really shine. The dough comes together in seconds in a food processor. Blackberries or raspberries may be used; a dash of cinnamon rounds out the berries' flavor. The biscuits are brushed with cream and given a light coating of sugar before baking, resulting in a crust with crunch. Vanilla ice cream is a sublime accompaniment/

Blackberries are in season and they are plump and scrumptious.  The only change I have made to the recipe is add 1/4 cup sugar to the dough.  It was a hit!

Serves 6 to 8

Ingredients

1 1/2 cups all-purpose flour

2 teaspoons baking powder

1/4 cup sugar

1/2 teaspoon salt

4 ounces (1 stick) cold unsalted butter, cut into small pieces

3/4 cup cold heavy cream, plus more for brushing

1/4 teaspoon ground cinnamon

1/2 cup sugar, plus more if needed and for sprinkling

3 tablespoons cornstarch, plus more if needed

6 cups (3 pints) blackberries or raspberries

Vanilla ice cream, for serving (optional)

Directions

1.Preheat oven to 375 degrees. Pulse flour, baking powder, sugar and salt in a food processor until combined. Add butter, and process until mixture resembles coarse meal. Transfer mixture to a large bowl, and add heavy cream in a slow, steady stream, mixing with a wooden spoon until dough just comes together. Divide dough into 9 pieces, and loosely form each into a ball.

2.Whisk together cinnamon, sugar, and cornstarch in a bowl. Add berries; toss gently to coat. Transfer mixture to an 8-inch square baking dish. Top berries with dough balls, spacing evenly. Brush dough with heavy cream, and sprinkle with sugar. Bake until berries are bubbling in center and biscuits are golden brown, 45 to 50 minutes. Transfer dish to a wire rack, and let cool slightly, about 30 minutes. Serve with ice cream if desired.

Cook's Note

The amount of sugar and cornstarch needed will depend on the sweetness and ripeness of the fruit. Taste the berries. If they are sour, add an extra 1/4 cup sugar in step 2. If juicy, add an extra 1 teaspoon cornstarch. To catch any juices that may bubble over when baking, place the baking dish on a rimmed baking sheet or lay a piece of foil on the rack below the cobbler.

Vatiation:

Peach Cobbler 


You can substitute 8 sliced and peeled peaches for the blackberries.  Omit the cinnamon and add a dash of bourbon if you like.

  • 6 large peaches, cut into thin wedges
  • 1/4 cup sugar
  • 1 tablespoon fresh lemon juice
  • 1 teaspoon cornstarch

Recipe adapted from Martha Stewart
bottom photo Lindaraxa


Sunday, November 21, 2010

Reprise...Chocolate Bourbon Pecan Pie


This was last year's top post in Lindaraxa's Garden.  I thought I would post it again for those of you who are new to this blog.  You will make a splash with this one!

One of the most important things about this pie is toasting the pecans beforehand.  Really, do go the extra mile, it makes a world of difference as far as flavor is concerned.  Place whole or halved pecans on an ungreased sheet pan and toast in a 350 degree oven for 10-12 minutes, stirring a few times until light brown and fragrant. Let cool and set aside.

Don't scrimp on quality when it comes to making the best chocolate pecan pie for the holidays. As important as toasted and roasted pecans are to this pie, so is the type of chocolate used. Gourmet chocolate would include such brands as; Lindt chocolate, Ghirardelli chocolate and Callebaut chocolate. Mini chocolate chips are easy to use, and shaved or finely chopped dark chocolate works well too. These two ingredients -- toasted or roasted pecans and gourmet chocolate -- will be the deciding factor between a so-so chocolate pecan pie and a knock-your-socks-off, have-to-have-some-now chocolate pecan pie! A few drops of bourbon won't hurt either.


Servings:  8 - 10


Ingredients

1 deep dish 9 inch basic pie crust

3/4 cup gourmet chocolate chips or shaved dark chocolate

1 1/2 cup toasted pecans, shelled and chopped in half if desired

1/3 cup butter, melted

3/4 cup light brown sugar, packed

3/4 cup Karo light corn syrup

3 large eggs

3 TB Bourbon

Directions:

Preheat oven to 350 Degrees F with rack in lowest position.  Prepare pie crust ahead of time  whether you are making one or buying one already made such as Mrs. Smith's. Place toasted pecans in the bottom of the unbaked pie shell (don't worry, they will rise to the top when the pie is fully baked ). Sprinkle chocolate chips or shaved chocolate over the pecans. Place the pie crust on a baking sheet to prevent drips and set aside.

Melt butter in a medium saucepan. Turn off heat. Add brown sugar, stir until dissolved and pour into a large mixing bowl. Mix well with the whisk attachment.

Add corn syrup and mix again. Scrape.

Mix in bourbon and eggs, beating to mix well, but not foamy.

Carefully pour batter over the chocolate chips and pecans, being careful not to disturb them.

Bake at 350 degrees for approximately 50 to 60 minutes or until top is slightly browned and puffed up. This will fall during cooling.  Make sure you let the pie cool on a wire rack for at least 4 hours.

Chocolate Pecan Pie cuts best when it is chilled. Use a sharp knife. Let cool completely before wrapping. This pie freezes well, so make extra!

.

Sunday, August 22, 2010

Tomato Basil Tart


This recipe calls for plum tomatoes, but if you have access to local farm stands, choose whichever tomatoes are at their best. If the tomatoes are large and juicy, you don't need to cook them on the stove before baking. However, be sure to sauté the garlic in olive oil to diminish its raw, pungent flavor.

I know you are probably sick of reading tomato recipes but I'm overflowing with them and I am digging up any recipe I can get my hands on.  I'm sure there are a couple of you in the same boat out there so enjoy! Don't forget to make plenty of tomato sauce for the winter months ahead.  You will be thankful to have some on hand in January!


Ingredients:

For the pastry:

1 1/4 cups all-purpose flour

1/2 tsp. salt

10 Tbs. (1 1/4 sticks) chilled unsalted butter,

cut into 1-inch pieces

2 Tbs. ice water, plus more as needed

For the filling:

1/3 cup plus 2 Tbs. extra-virgin olive oil

2 garlic cloves, thinly sliced

8 plum tomatoes, halved lengthwise and seeded

Salt and freshly ground pepper, to taste

8 oz. goat cheese (chèvre)

1 cup slivered fresh basil leaves

Directions:

To make the pastry, in the bowl of an electric mixer fitted with the flat beater, combine the flour and salt and beat on low speed for 15 seconds. Add the butter and continue beating until the mixture resembles pea-size crumbs, 30 to 45 seconds. Add the water 1 Tbs. at a time and continue beating, adding more water as needed, until the dough comes together. Turn the dough out onto a lightly floured surface and press together to form a 5-inch disk. Wrap with plastic wrap and refrigerate at least 1 hour.

Position a rack in the lower third of an oven and preheat to 400°F.

On a lightly floured surface, roll out the dough to 1/8-inch thickness to fit a 13 3/4-by-4 1/4-inch tart pan. Press the dough into the pan and trim dough, leaving a 1/2-inch overhang around the rim. Fold in the excess dough and press it into the sides so they are thicker than the bottom. Refrigerate at least 10 minutes.

To make the filling, in a large nonstick sauté pan over medium heat, warm the 1/3 cup olive oil, add the garlic and fry, stirring occasionally, until fragrant, about 1 minute. With a slotted spoon, transfer the garlic to a plate and set aside. Season the tomatoes with salt and pepper and arrange them in the pan, sliced side down. Cook, without stirring, until the tomatoes are lightly golden underneath, 4 to 5 minutes. Transfer to a platter. Remove the pan from the heat and stir in the goat cheese, garlic, 1/2 cup of the basil, salt and pepper until smooth and blended.

Brush the pastry with 1 Tbs. of the olive oil and spread the goat cheese mixture evenly over the bottom. Top with the tomatoes, sliced side up, drizzle with the remaining 1 Tbs. olive oil, and season with salt and pepper. Bake until the crust is golden and crisp, about 1 hour. Transfer the tart to a wire rack and cool at least 10 minutes.

Remove the tart from the pan and cut the tart crosswise into slices about 3 inches wide. Garnish with the remaining 1/2 cup basil and serve immediately.

Serves 4 to 6.

Williams-Sonoma Kitchen.

Thursday, August 19, 2010

Rustic Red Raspberry Turnovers


Thinking that we needed a break from tomatoes, I'm sharing this turnover recipe from Fine Cooking magazine.

The raspberries this summer are plump and juicy, better than I've seen them in the past.  I've been having them with my cereal in the morning and adding them to peaches for dessert.  Although the crust used in this recipe is not the easiest to work with, it is so delicious it is well worth the extra trouble.  Just try not to handle it too much and stick in the fridge for a few minutes if needed.You can also substitute blueberries, so take your pick. 

The only change is the oven temperature which has been reduced from 400 to 350 degrees.  The higher temperature seems to burn the edges before the rest is fully baked.  At 350 degrees the turnovers cook nice and evenly.

 
Ingredients

1 recipe Buttery Shortbread Pastry Dough

4 tsp. granulated sugar; more as needed

1 Tbs. all-purpose flour

1/2 tsp. ground cinnamon

1/4 tsp. ground nutmeg

2 cups (8 to 10 oz.) fresh red raspberries, rinsed and air-dried or patted dry with paper towels

1 to 2 Tbs. milk


Directions

Divide the pastry in half. Pat each half into roughly a square shape about 1 inch thick, wrap each in plastic, and chill for 20 minutes.

Line a rimmed baking sheet with parchment. On a lightly floured surface, using a floured rolling pin, roll out one square of the pastry into a 9x14-inch rectangle. If the dough is too sticky, dust it too with a little flour. Cut the dough into six rounds, each about 4 inches in diameter. Remove the excess dough from around the rounds and discard or save for another use. Run a metal spatula under each round to separate it from the counter.

In a large bowl, stir the 4 tsp. sugar and the flour, cinnamon, and nutmeg. Add the raspberries and gently toss to coat. Taste and add more sugar if the fruit seems tart.

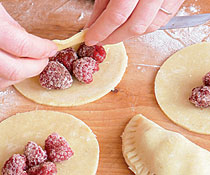
Put a heaping tablespoon of raspberries (three to six berries, depending on size) in a single layer on one half of each dough round. Press gently to flatten the berries a bit. Dampen the pastry edges with a little water and carefully fold the other side of the dough over the berries to make a half moon. Press the edges of the dough together with your fingers or the tines of a fork. If any small cracks formed in the dough, pinch them together as best you can with damp fingers. Use a spatula to transfer the turnovers to the baking sheet.

Repeat this process with the remaining half of the pastry dough and the rest of the berries. When all the turnovers are assembled, refrigerate for at least 15 min. and up to 4 hours. Meanwhile, position a rack in the middle of the oven and heat the oven to 350°F. (original recipe calls for 400 degrees for 20-25 mins. but I found this browned the crust too fast and didn't cook inside)

When ready to bake, brush the tops of the turnovers (but not the edges or they will get too brown) with the milk and sprinkle with sugar. Bake until golden brown, about 30 mins. Transfer to a rack to cool. Serve warm or at room temperature.

 photo: Scott Phillips
Adapted from Fine Cooking Magazine


Buttery Shortbread Pastry Dough
by Janie Hibler


This versatile dough can be used for everything from tarts to pie crust to turnovers. The dough is quite soft, but all the butter in the recipe makes it forgiving and easy to work with. When baked, the crust is very tender—almost like a shortbread cookie.

Yields enough dough for 1 single pie crust, 8 mini tarts, or 12 turnovers.


Ingredients

9 oz. (2 cups) bleached all purpose flour

7 oz. (14 Tbs.) chilled unsalted butter, cut into 1-inch pieces

1 large egg, lightly beaten

2 Tbs. granulated sugar

1 Tbs. chilled heavy cream

2 tsp. fresh lemon juice

1 tsp. table salt


Directions

In a food processor, combine the flour, butter, egg, sugar, cream, lemon juice, and salt and pulse until the dough starts gathering together in big clumps, as shown below. Turn the dough out onto a counter and gather it together. Shape the dough as directed in the recipe you’re making.

Recipe adapted from Fine Cooking Magazine

Thursday, April 22, 2010

Strawberry Almond Cream Tart


We've got to make this, people, particularly now that strawberries are cheap.  And don't forget strawberry preserves to give away this Christmas.  Believe me, you'll be glad you did! I can see my weekend unfolding before my eyes....

This recipe is from the new Cooking Light Cooking Through the Seasons via Steamy Kitchen.

Instead of making individual tartlettes, you can make one big tart, just use a 9-inch removable bottom tart pan

Ingredients

Crust:

36 honey graham crackers (about 9 sheets)

2 tablespoons sugar

2 tablespoons butter, melted

4 teaspoons water

Cooking spray

Filling:

8 ounces cream cheese

1/4 cup sugar

1/2 teaspoon vanilla extract

1/2 teaspoon finely grated lemon zest (use a rasp grater)

Topping:

6 cups small fresh strawberries, divided

1/3 cup sugar

1 tablespoon cornstarch

1 tablespoon fresh lemon juice

3 tablespoons sliced almonds, toasted

Six 4-inch round removable-bottom tart pan or one 9-inch pan


Directions:

Preheat oven to 350°.

To prepare crust, place crackers in a food processor; process until crumbly. Add 2 tablespoons sugar, butter, and water; pulse just until moist. Place mixture in 6 mini round removable-bottom tart pan coated with cooking spray, pressing into bottom and up sides of pan to 3/4 inch. Bake at 350° for 10 minutes or until lightly browned. Cool completely on a wire rack.

To prepare filling, combine cream cheese, 1/4 cup sugar, and extracts in a medium bowl; stir until smooth. Spread mixture evenly over bottom of tart shell.

To prepare topping, place 2 cups strawberries in food processor; process until pureed. Combine strawberry puree, 2/3 cup sugar, and cornstarch in a small saucepan over medium heat, stirring with a whisk. Bring to a boil, stirring constantly. Reduce heat to low; cook 1 minute. Remove glaze from heat, and cool to room temperature, stirring occasionally.

Combine 4 cups strawberries and juice; toss to coat. Arrange berries, bottoms up, in a circular pattern over filling. Spoon half of glaze evenly over berries (reserve remaining glaze for another use). Sprinkle nuts around edge of each tart. Cover and chill 3 hours.


Photo Steamy Kitchen

Friday, April 16, 2010

Asparagus Gruyere Tart


This is really simple to make and makes a great splash.  Delicious with a baked ham, salmon or grilled lamb chops!


Ingredients


Serves 4

Flour, for work surface

1 frozen puff pastry

5 1/2 ounces Gruyere cheese, shredded (2 cups)

1 1/2 pounds medium or thick asparagus

1 tablespoon olive oil

Salt and pepper

Directions

1.Preheat oven to 400 degrees. On a floured surface, roll the puff pastry into a 16-by-10-inch rectangle. Trim uneven edges. Place pastry on a baking sheet. With a sharp knife, lightly score pastry 1 inch in from the edges to mark a rectangle. Using a fork, pierce pastry inside the markings at 1/2-inch intervals. Bake until golden, about 15 minutes.

2.Remove pastry shell from oven, and sprinkle with Gruyere. Trim the bottoms of the asparagus spears to fit crosswise inside the tart shell; arrange in a single layer over Gruyere, alternating ends and tips. Brush with oil, and season with salt and pepper. Bake until spears are tender, 20 to 25 minutes.

From Everyday Food, March/April 2003

It's Foodie Friday over at Designs By Gollum and I'm going over for a visit, come along, great stuff!

Wednesday, April 14, 2010

Tangerine Tart With Cookie Crust


This fabulous tart is from my friend and fellow blogger, Patti Londre, from Worth The Whisk. Patti has previously been a guest blogger on my main recipe blog, Lindaraxa's Garden, last fall. She's a great baker and has a wonderful blog; moreover, she also takes great pictures with her new camera which took forever to come to her door. All of Twitter held its breath until camera was finally on hand!

Tangerine Tart With Cookie Crust
by Worth The Whisk on March 1, 2010

Dinner party at Barbara and David’s – pleeeeze let me bring Tangerine Tart. For more than a decade, I’ve held onto this Sunset Magazine page. You see, the prolific tangerine tree that came with this house disappeared the day our yard was demo’d for landscaping. Waaaaa. Not sure why I never just bought fruit to make the tart; maybe I was insecure. Tangerines can do that to you (juicy? seeds? hard to peel? watery? acidic? good zest?)

This recipe was clipped in the year 2000 from Sunset’s Kitchen Cabinet column of readers’ recipes. Liz Strongman of Seattle is the creator. It’s a tangerine-infused cookie crust, tangerine filling, tangerine whipped cream. Whoa, I am skipping the whipped cream. And adjusted the instructions a bit to be clearer (see my note about pouring the filling).

My road trip to Ojai in search of the Pixie snacking tangerine resulted in a great education from my new friends at Friend’s Ranches citrus growers. For example, the W. Murcutt Tangerine is a luscious cooking citrus. More acidic than Pixie, juicier and a great peel for the “zest” in recipes. But dang, how to remember this variety’s name when standing at Friend’s Ranch farmers market stand? I decided to call it William H. Macy (you know… Fargo, Boogie Nights). Kind of looks like him, all redhead and slightly lumpy-bumpy.


Tangerine Tart with Cookie Crust
Adjusted from Sunset Magazine

COOKIE CRUST

2 cups all-purpose flour
3/4 cup powdered sugar
2 tsp. grated tangerine peel “zest”
14 Tbsp. (3/4 cup plus 2 Tbsp.) butter or margarine, in chunks
Preheat oven to 325 degrees F. In a food processor, whirl flour, sugar and zest to blend. Add butter one chunk at a time while whirling, just until dough holds together. Press over bottom and up sides of a 10-inch tart pan with removable rim. Bake 25 to 35 minutes or until crust is lightly browned.

(NOTE — Instead of taking the hot tart shell out of the oven, have the filling ready to pour straight into the baked crust while still on the rack. This help to avoid a wobbly transfer back into the oven. Larry saw me do the other way, slopped some filling down the cabinet front, and suggested this. Smart.)

FILLING

2 large eggs
2/3 cup granulated sugar
2 tsp. grated tangerine peel “zest”
1/2 cup fresh tangerine juice (3 to 4 juicy tangerines, such as W. Murcott variety)
1 1/2 Tbsp. fresh squeezed lemon juice
1/4 cup half-and-half (light cream)
In a bowl with a mixer on high speed, beat eggs and granulated sugar until well blended. Add tangerine zest, tangerine juice, lemon juice and half-and-half. Beat until blended. Pour into baked cookie crust. Bake at 325 degrees F. 30 to 40 minutes or until the filling no longer jiggles in the center when the pan is gently shaken. Let cool completely on a rack, about an hour. Makes 8 to 10 servings.

Wednesday, March 31, 2010

Almond Macaroon Galette With Strawberries


This is a fantastic and easy dessert  now that fresh strawberries are available everywhere.  If you haven't thought of an Easter dessert, this is it!

Ingredients


Serves 12

3 large egg whites

2 teaspoons finely grated lemon zest, plus 2 teaspoons fresh lemon juice

1 cup confectioners' sugar

1 1/2 cups sliced blanched almonds, toasted and finely ground in a food processor

Vegetable-oil cooking spray

1 1/2 pints strawberries (about 6 cups), hulls on

1 tablespoon granulated sugar

1 tablespoon kirsch

3 tablespoons strawberry jam

Directions

1.Preheat oven to 325. Put egg whites into the bowl of an electric mixer fitted with the whisk attachment. Beat on medium speed until soft peaks form. Beat in lemon zest. Gradually add confectioners' sugar, beating until whites are glossy and hold a ribbon on surface. Fold in almonds.

2.Coat the inside of an 8 3/4-inch flan ring with cooking spray, and place on a baking sheet lined with parchment paper. Spoon batter into mold, and smooth top. Let stand 10 minutes. Place cake in oven; prop door open about 1/2 inch using a wooden spoon. Bake 10 minutes. Reduce oven to 300, and close door completely. Bake until pale golden and set, about 25 minutes. Unmold, and let cool completely on a wire rack.

3.Halve 8 to 10 strawberries lengthwise; set aside. Hull remaining strawberries, and cut each lengthwise into 4 slices. Toss slices with granulated sugar, kirsch, and lemon juice in a medium bowl; let stand at least 30 minutes (up to 2 hours), stirring occasionally.

4.Heat jam in a small saucepan until thin. Brush over top of galette. Arrange reserved strawberry halves around edge, with hulls facing out. Working inward, arrange sliced strawberries in a circular pattern, with bottoms facing out, reserving smallest slices for center. Drizzle liquid from strawberries over top. Serve immediately, or let stand up to 2 hours to allow juices to soak into cake.

From Martha Stewart Living, April 2007

Tuesday, August 25, 2009

End of Summer Peach Crumb Pie

Every year I do the same thing...come peach season I can't resist buying a big box of peaches and when I come home, pandemonium! I always think they will ripen in sequential pairs, but of course this isn't going to happen. Last night we had them marinaded in Prosecco, this morning I had some for breakfast, and tomorrow I will cheat, as they are not white peaches, and make a bastard Bellini. That still isn't going to cut it, so today I decided to make a pie, an easy pie. What makes it easy is the ready made pie shell and the crumb topping...no flour to mess with!

This pie should satisfy everybody. It's relatively tart on the inside ( I hate gooey over sweet fillings) but I went to town on the crumble. The result, the best I've had so far, seriously. Don't worry about the high temperature in the beginning and check on the pie after 20 minutes. If the edges are getting too dark, cover them with tin foil and return to oven. I have a gadget that you put over just the edges, and its great.


Ingredients

9- inch prebaked pie shell according to package directions


FILLING:

4 c. peeled and sliced peaches

1/4 - 1/2 c. sugar*

1/4 c. plain flour

2 tbsp. lemon juice


Combine all ingredients. Mix gently. Pour into a prebaked 9-inch pie shell


TOPPING:

1/2 c. cold butter

3/4 c. plain flour

1/2 c. brown sugar

1/4 c. regular sugar


Instructions

Cut up butter in about 8 pieces. Process butter, sugar and flour until crumbly in a food processor (pulse about 5 times). You want the mixture crumbly! Spread over pie filling. Bake at 450 degrees for 10 minutes, then at 350 degrees for 30 minutes more. You might need to cover the edges about 10 minutes before pie is done. Serve warm.

*Cooks Note I've given you a range depending on the fruit and how sweet or tart you like your filling. I used 1/4 c in mine.

LinkWithin

Related Posts with Thumbnails